

Left or right chest is your go-to spot for logos, sized around 3 to 4 inches wide. Center back works best for statement designs, typically covering a large area suitable for garment size and design detail. Sleeves handle secondary marks, and the hood or the space above the kangaroo pocket adds a playful accent. For durability, sew when you can and heat-apply when speed matters more than lifetime wear.
TL;DR:
- Place large patches like logos on the center back for maximum visibility, with sizing around 8 to 12 inches depending on hoodie size.
- Measure patch placement from reliable anchors such as the high point shoulder and centerline, avoiding collar or hem references that shift with wear.
- Heavier fabrics support larger patches and more detailed designs, while lightweight fleece requires scaled-down patches or flexible backing for best results.
- Sewn patches provide the strongest durability, but heat-apply patches are faster and suitable for small runs, with added topstitching extending their lifespan.
- Testing patch placement on actual samples, including washing, prevents costly mistakes and ensures the design remains aligned and comfortable in real wear.
Table of Contents
- Where Should You Place a Patch on a Hoodie?
- How Do You Measure Patch Placement Accurately?
- Does Hoodie Fabric Affect Where a Patch Should Go?
- Sewn, Heat-Applied, or Both? Choosing an Attachment Method
- How Do You Scale Patch Placement Across Sizes?
- What Should You Test Before a Full Production Run?
- How Should You Care for a Patched Hoodie?
- What Design Choices Make a Patch Look Intentional?
- What Are the Most Common Patch Placement Mistakes?
- Does Patch Placement Affect How Comfortable a Hoodie Feels?
- Why Getting Placement Right Matters More Than People Think
- Ready to Test Your Placement Before You Commit?
- Sources
Where Should You Place a Patch on a Hoodie?
Not every patch deserves the same real estate, and ranking your options by visibility and purpose makes the decision almost automatic.
Center back wins the attention contest every time. It’s the largest flat canvas on the garment, which makes it the natural home for a brand statement, an art piece, or anything you want people to notice from fifteen feet away. Left or right chest comes next, doing the identity work that a logo needs to do without shouting. Sleeve placements play a supporting role, ideal for a secondary mark, a small tagline patch, or a batch/edition number. Hood placements and the area above the kangaroo pocket are your subtle or playful spots, best for a small accent that rewards a closer look rather than demanding one from across the room.
Here’s how that translates to size, based on standard adult hoodie proportions:
- Center back — 8 to 12 inches wide, depending on the garment size and how much detail the design carries.
- Left or right chest — 3 to 4 inches wide, matching the common sizing range used across the apparel decorating industry.
- Sleeve — 1.5 to 3 inches wide, small enough to sit cleanly on the curved surface.
- Hood or above the pocket — under 2 inches, kept intentionally modest.
Pick one focal patch and let everything else support it. Designers who combine a chest logo with a larger back design consistently get better results than those who cluster multiple bold patches on one side, which tends to look cramped instead of intentional.
How Do You Measure Patch Placement Accurately?
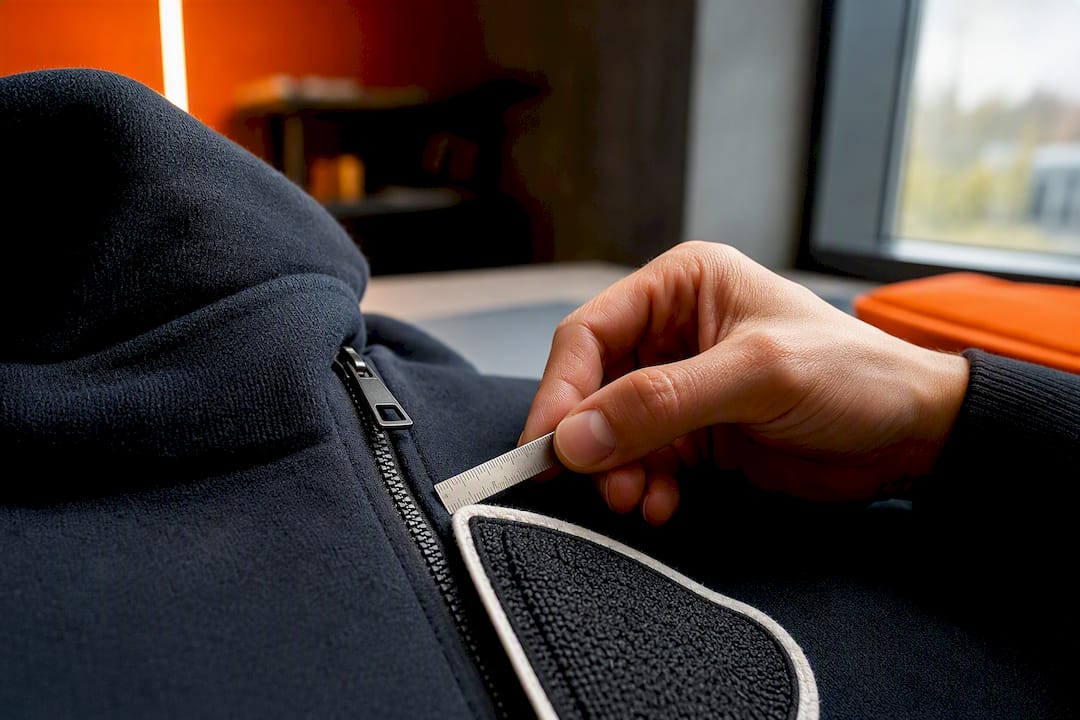
Two reference points do almost all the work: high point shoulder (HPS), the seam where the shoulder meets the collar, and the body centerline, the vertical midline running down the front and back of the garment. Every reliable measurement starts from one of these two anchors instead of guessing from the collar or hem, which shift depending on how the hoodie is folded or worn.
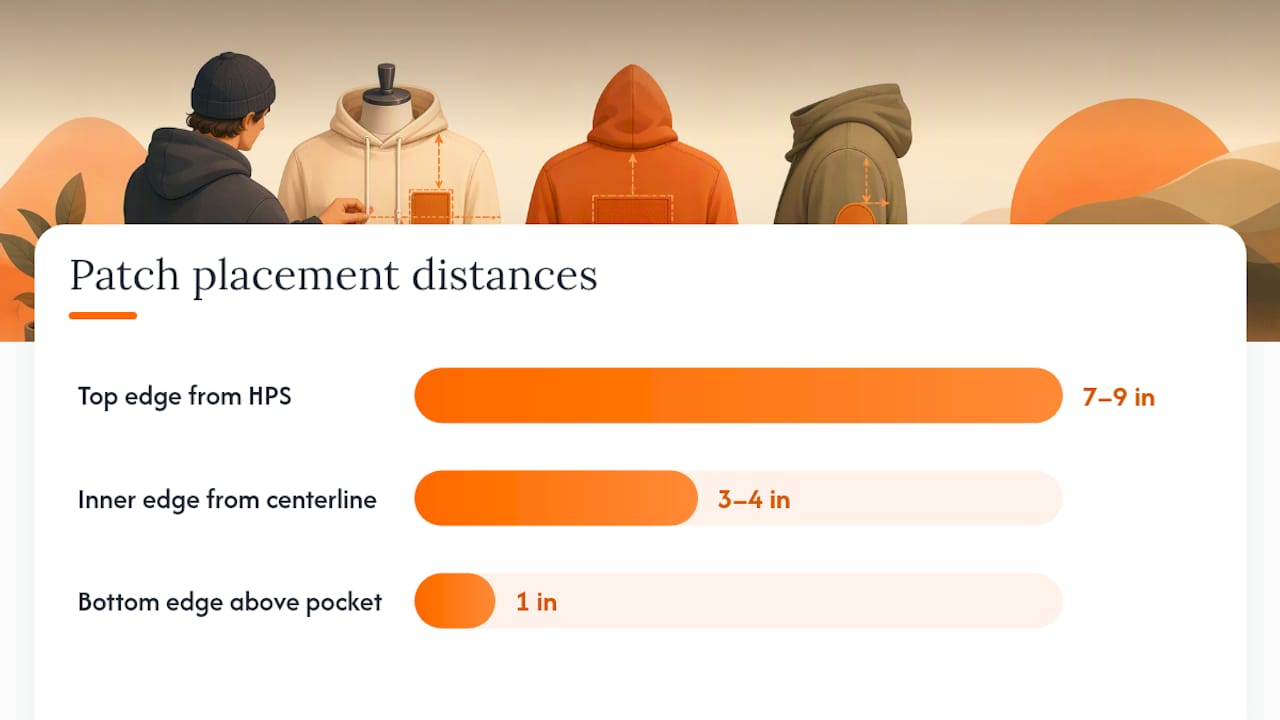
For an adult hoodie, a left chest patch typically sits with its top edge 7 to 9 inches down from the shoulder seam, and its inner edge 3 to 4 inches out from the centerline. Keep the bottom edge of any front patch about 1 inch above the kangaroo pocket seam, a rule that prevents distortion and uneven pressure when the patch meets the pocket’s double layer of fabric.
Here’s the templating process that removes the guesswork:
- Lay the hoodie flat on a table, front side up, and smooth out any wrinkles.
- Mark the HPS on both shoulders with a fabric pencil or a small piece of tape.
- Measure down and out from HPS to your target coordinates, then mark the spot lightly.
- Cut a paper template to the patch’s exact dimensions and pin or tape it in place.
- Try the hoodie on a mannequin or a person and photograph it before committing to anything permanent.
Pro Tip: Photograph the paper template under the same lighting you’ll use for product photos. A patch that looks centered in flat lay can look off-center once the fabric drapes over shoulders and a chest.
Does Hoodie Fabric Affect Where a Patch Should Go?
Fabric weight changes more about your patch strategy than most people expect. A heavier hoodie, often described by its GSM (grams per square meter), gives you a flatter, more stable surface that accepts larger patches without rippling. Lightweight fleece is the opposite story: it puckers more easily under a large or heavy patch, so you either scale down the size or switch to a softer backing that flexes with the fabric.
Material choice should also match the hoodie’s overall look, not fight against it, especially when choosing from styles in The Hoodie – Only Queer Crew:
- Chenille patches lean vintage and collegiate, and they read best on heavier, structured fleece.
- PVC or faux leather patches, like OctoPatches’ faux material options, suit modern streetwear and hold sharp edges well.
- Contrast colors pull the eye toward the patch; tonal colors keep the design understated.
- Heavy or high-stitch-density patches should avoid thick seams, zippers, and pocket junctions, where uneven surfaces cause bunching and weak adhesion.
Leaving a safe zone around every seam junction, roughly a half inch, keeps the patch from fighting the garment’s own construction.
Sewn, Heat-Applied, or Both? Choosing an Attachment Method
Sewn-on patches remain the most durable option, which is why production runs for heavy wear or premium product lines almost always specify stitching. The thread bonds mechanically to the fabric, so it survives repeated washing and stretching far better than an adhesive bond alone.
Heat-applied patches earn their place for speed. OctoPatches’ heat-backed faux materials apply in seconds with a heat press, no sewing machine or thread-matching required, which makes them the practical choice for small runs, samples, or anyone testing a design before committing to a bigger order. The trade-off is that heat bonds alone can weaken with repeated washing over time, especially at the patch borders.
The hybrid workflow splits the difference well: heat-press the patch to tack it precisely in place, then run a quick topstitch around the border. You get the exact positioning speed of a heat press with the long-term hold of stitching.
A few practical settings to check before you press:
- Preheat the platen and confirm even pressure across the whole patch, not just the center.
- Use a heat-press pillow under seams or pocket edges to keep pressure consistent on uneven ground.
- Follow the backing manufacturer’s temperature and dwell time exactly; guessing leads to weak bonds or scorched fabric.
Pro Tip: If you’re topstitching through a thick patch border on heavy fleece, switch to a walking foot and a heavy-duty needle. It prevents skipped stitches and keeps the fabric feeding evenly under the patch.
How Do You Scale Patch Placement Across Sizes?
A patch that looks perfectly balanced on a medium can look lost on a 3XL or oversized on an XS if you use the same fixed inch measurements across your whole size run. Scale the patch proportionally to chest width, or better, use HPS offsets rather than a single fixed number, especially for cropped or boxy cuts where proportions shift more than on a standard fit.
Dropped shoulders and oversized silhouettes need their own vertical check too, since the shoulder seam sits lower on the body than it does on a standard cut.
Before locking in a production placement across your whole size range, run through this quick checklist:
- Template and photograph the largest and smallest sizes in the run, not just a middle sample.
- Confirm the patch clears the pocket seam and side seams at every size.
- Check that back patches don’t disappear under the hood on oversized fits.
- Compare photos side by side to catch scale drift between sizes.
What Should You Test Before a Full Production Run?
A paper template pinned to the actual blank catches problems no digital mockup ever will, since fabric drape and seam bulk only show up on the real garment.
- Cut and pin your paper template to the hoodie, then photograph it on a body or mannequin to check scale at a glance.
- Sample-press or sew one full garment and put it through at least one wash and dry cycle before approving the placement.
- Run a final on-press checklist: confirm seam clearance, check how the hood drapes over back placements, verify there’s no pocket interference, and use even pressure across the entire patch.
Skipping the wash test is the most common shortcut that backfires. A patch can look flawless fresh off the press and still lift at the corners after one laundry cycle if the bond wasn’t right.
How Should You Care for a Patched Hoodie?
Cold wash, gentle cycle, and turning the hoodie inside out protect both the patch and the print underneath it. Air-drying is the safest bet; if you tumble dry, use the lowest heat setting available.
- Sewn edges and topstitching resist fraying far longer than a heat-only bond exposed to repeated agitation.
- Heat-applied patches without stitched borders have real limits, and edges can start lifting after enough wash cycles.
- A simple care label line works well: “Machine wash cold, inside out. Tumble dry low or air dry.”
What Design Choices Make a Patch Look Intentional?
Placement gets a patch onto the hoodie correctly, but design choices determine whether it looks like branding or an afterthought. Start with contrast: a patch that’s only slightly darker or lighter than the fabric around it tends to vanish in photos and in person, so lean into a color that reads clearly against your specific hoodie shade.
Border style matters more than most designers give it credit for. A merrowed edge gives a patch a classic, finished look that suits vintage and collegiate styles, while a laser-cut or die-cut border with no visible stitching around the edge fits modern streetwear better, especially with faux leather or PVC materials. Match the border to the aesthetic you’re already building, not the other way around.
Shape is another lever you can pull without adding cost. A custom die-cut shape, rather than a standard rectangle or circle, makes a patch feel designed specifically for that hoodie instead of ordered off a shelf. If your brand has a distinctive icon, letting the patch take that shape often reads stronger than a rectangular patch containing the same icon.
Finally, think about how the patch interacts with the hoodie’s existing hardware. A patch placed too close to a drawstring, zipper pull, or metal snap will catch and shift over time, so keep a visual buffer between the patch edge and any moving hardware, even if it means adjusting your planned position by half an inch.
What Are the Most Common Patch Placement Mistakes?
The single biggest mistake is measuring from the collar or hem instead of the high point shoulder, since those reference points shift depending on how the garment is folded, worn, or sized. Anchor every measurement to HPS and centerline, and your placements stay consistent across an entire production run.
A close second is ignoring the kangaroo pocket entirely. Front patches placed without checking pocket clearance often end up crossing the pocket seam, which creates a lumpy, uneven surface that’s nearly impossible to press or sew flat. Keep roughly an inch of clearance above the seam and this problem disappears.
Oversizing a chest patch is another frequent error, usually born from wanting the logo to feel “important.” A patch pushed past 4 or 5 inches wide on the chest starts crowding the shoulder seam and the pocket, leaving no breathing room. Bigger doesn’t automatically read as bolder; it often just reads as cramped.
Skipping the physical mockup is the mistake that causes the most expensive regrets. A placement that looks centered on a flat digital rendering can shift noticeably once the fabric drapes over a body, particularly on back placements where the hood can partially cover a patch that sat clear in a flat sketch. A five-minute paper template check catches this before it becomes a full batch of misaligned product.
Does Patch Placement Affect How Comfortable a Hoodie Feels?
Placement isn’t purely a visual decision. A patch sitting directly under a backpack strap, seatbelt line, or bag strap will rub against that pressure point all day, and a stiff patch material there gets noticed fast by the person wearing it. Chest placements generally clear this zone, but sleeve patches near the shoulder can sit right where a bag strap crosses.
Stiffer materials like faux leather or thick PVC add a small amount of rigidity wherever they sit. On a chest or back placement, that’s rarely noticeable since the fabric has room to move independently. Near a seam, an armpit, or the inner elbow, the same stiffness can restrict natural movement and create a rubbing point during exercise or extended wear.
Patch weight matters too, especially for larger back designs. A heavy, dense patch on lightweight fleece can pull the fabric slightly out of shape over time, changing how the hoodie hangs on the body. Choosing a lighter backing or scaling down the patch on a lightweight blank keeps the garment’s original drape and comfort intact.
Why Getting Placement Right Matters More Than People Think
Most guides treat patch placement as a purely visual decision, a matter of taste and symmetry. That undersells what’s actually happening. Placement is a production decision disguised as a design one, and the brands that treat it that way end up with fewer returns, fewer complaints about peeling edges, and product photos that actually match what customers receive.
The gap we see most often isn’t bad taste, it’s skipping the physical check. A design that looks flawless in a mockup file can fail the moment it meets a real pocket seam or a hood that drapes lower than expected. That’s not a creative problem; it’s a measurement problem, and it’s entirely preventable with a paper template and five minutes of patience.
We’d also push back gently on the idea that heat-applied patches are somehow the “lesser” option compared to sewing. For a small brand testing a new design or running a limited drop, heat application is often the smarter call, not the compromise. The mistake isn’t choosing heat, it’s choosing it for a heavy-wear product without adding a topstitch at the border where sewing genuinely earns its keep.
— OctoPatches
Ready to Test Your Placement Before You Commit?
OctoPatches builds heat-applied patches in faux leather, denim, carbon fiber, and a handful of other textures, with no minimum order standing between you and a real sample. That matters most right before a production run, when you need to see a patch on an actual hoodie instead of trusting a flat mockup.
Order a small batch first, press one onto your blank, and run it through a wash cycle before you commit to your full size range. If the design is headed for a heavy-wear product, plan to topstitch the border after pressing for extra hold. Not sure your artwork will translate cleanly to a patch? Our professional design setup service handles that conversion for you. When you’re ready to move, head to the custom patches page and place your first order.
Sources
- Hoodie Print Placement Guide: Size Chart and Pro Tips - Fresh Prints Supply Co
- Embroidery patches on hoodies: Design tips for a professional finish - René Bassett
- Custom hoodies with patches: The complete creation guide - TZ Streetwear